Ok back again. The past months have been busy. Been sourcing parts for my friends Elefant like adjustible cam belt pulleys, dyna coils etc and some parts for others.
During winter when it was too cold to work in the garage I looked around for some nice bits for myself so I got some frame plugs (22mm), a new shifter rod, rear axle plates, replaced the rear axle as the old one was scratched, got a set of black Brembos (to match the rear black caliper) as the current front Brembos are golden, an ultrasonic bath as I always wanted one, a laser chain tool and some other small bits.
These are a much better guide than the flimsy original steel parts.
Meanwhile I found some db killers for a BMW that could be modified to fit in my L&W cans. That thing in the end is a fake db killer which I took as it looks much better with it as when you see the spot welded cone only. This still doesn`t make them legal but less noticable by noise and looks.
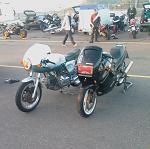
(Baukes old 906 with L&Ws)
As it´s the easiest to pass vehicle inspection with a bike in near original condition the next step towards completion was rebuilding the Weber. The Weber was completely stripped, cleaned, all seals and gaskets replaced. A set of jets was ordered same as a new throttle axle (expensive), new throttle plates, throttle axle bearings and a bottom gasket which was not so easy to find. Well over €100 spent only on parts

The typical residue in the float chamber if the fuel isn`t drained before storage.
Of course the jets below where removed before ultrasonic cleaning. This was the beginning of reassembly.
The progression holes, the small group in the middle. There seem to have been different models of Webers. My Weber/Dell orto (DCOE, DCO/SP & DHLA) book says "Both manufacturers have made emission versions of their respective carburettors, but these are not as good as the 'universal performance' versions, in terms of best possible all around accelerative and top end performance. Note that one of the quickest ways to establish at a glance wether a sidedraught Weber or Dellorto carburettor is suitable for high performance use is to count the number of progression holes. Any carburettor which has two or three very small diameter (1mm, 0.040inch) progression holes will have a rich progression phase, all other factors being equal. Carburettors with five quite large diameter (2mm/ 0.080inch) progression holes will have a weaker progression phase, all other factors being equal." I wonder if this is valid also for the DCNF.
The old bearings where moving rough which only could be felt after the return spring was removed.
I read that the open original bearings could also be a reason for leak air so I got sealed ones.
Adjusting the throttle plates to close as perfectly as possible was a pita.
As I couldn`t figure out which base gasket was the correct one I got the phenolic block and the thinner graphite gasket. I guess I`ll see if the airbox hits the tank or not.
The phenolic block was impossible to find for the 44 so I had to get a smaller one and modify it.
The inlet manifold got additional screw nipples as I will use an underpressure fuel pump and valve. If you don`t how would you measure syncronization if there isn`t a second nipple ?! Also it may come handy if one day I decide for a Scottoiler.
the laser chain tool
The original sprocket was of course off due the rear spacer
The offset sprocket is just fine
However, not being 100% convinced of my solution I had a custom sprocket made. It costs about 5x the price of an original one but I´ll sleep better now. The new sprocket has a few mm more offset than the original one. I`m not writing how much as it`ll only confuse as I doubt there`s anyone out there with the identical setup.
The shocker came the first time the new sprocket arrived. The shop meant well making the sprocket quite thick to prevent whobble but 390g vs 190-215g original was not acceptable. I had sent them correct drawings they ignored as they probably thought they knew better. No matter it didn`t fit anyway as the drive shaft is not that long.
They claim 7-10 days for a new sprocket. In my case it took amost 4 weeks for the first shot. Of course it was not their fault but the fault of another shop who does the hardening. They just hadn`t gathered enough parts yet to make it economical.
The sprocket was sent back with an original one and turned down to identical thickness.
When received 2 weeks ago I had to notice it still didn`t fit as obviously unlike many other bikes the fit is by the millimeter. When turned down the bezel of the sprockets inner teeth was not redone so this was probably the 1mm that was still missing to get the securing clip in its groove.
I should get it returned the next days, I hope it`ll fit now.
The complete electrics I had finalised this spring, the non working warning light output of the emergency flasher being the last thing to fix (with a 5W Schottky diode).
This all ongoing and the weather being increadible so far I continued with my airbox.
The position of the filter and the inlet ducts was still undecided as difficult. Snorkels on the bottom rear like the original ones would`ve been nice but wouldn`t work so I figured I`d do it like on the 907ie and put some snorkels in the front. That idea was scrapped after having done that as I didn`t like it and the space above the carb being the most important I didn´t want to have the inlet ducts just there.
Going through ebay I was lucky finding some oval snorkels which were told to be from an ST model which I doubt very much. These were perfect.
The holes intended for the front snorkels had to be closed and new ducts made to mount the snorkels.
Horn and fuel pump need to be relocated but I`ll figure that out later.
Finding filters that would fit was another mission that basically took months. The box is narrow so no K&N would fit. I don`t know how many catalogues I studied before I ended up with foam filter socks (from RAM AIR) actually for velocity stacks.
The actual measurements were totally off from what they should have been according to the data sheet so they went back to the UK.
At UNI FILTERS ins Autralia I finally found the perfect match and Claude was so nice to help me having them here only within a few days (thanks again !!!)
They didn`t fit right away so I had to cut out triangles of the sides of the airbox and bulge them.
The past days I did nothing than wet sanding which brings me to a halt today. The finger tips won`t play along so with the weather having turned fresh and wet today it`s a good time for healing and an update.
G.
PS: (offtopic) another thing that kept me busy was my car. If your car stands outside a lot do check all drain holes once in a while. I missed that although I do check the drain holes of the sunroof. My car has a compartment where the battery and whiper linkage is mounted. This is devided from the engine compartment and has two draining holes. Leaves and other stuff will collect at the rear edges of the bonnet and rot sooner or later clogging the draining holes. One can see on the right how high the water stood up to the point where it was higher than some rubber grommet where it then spilled inside the car. The complete interior needed to be stripped as the carpet was soaked. Meanwhile it`s all cleaned, dried and reassembled. You may give your draining holes a check, too ...


") )
)